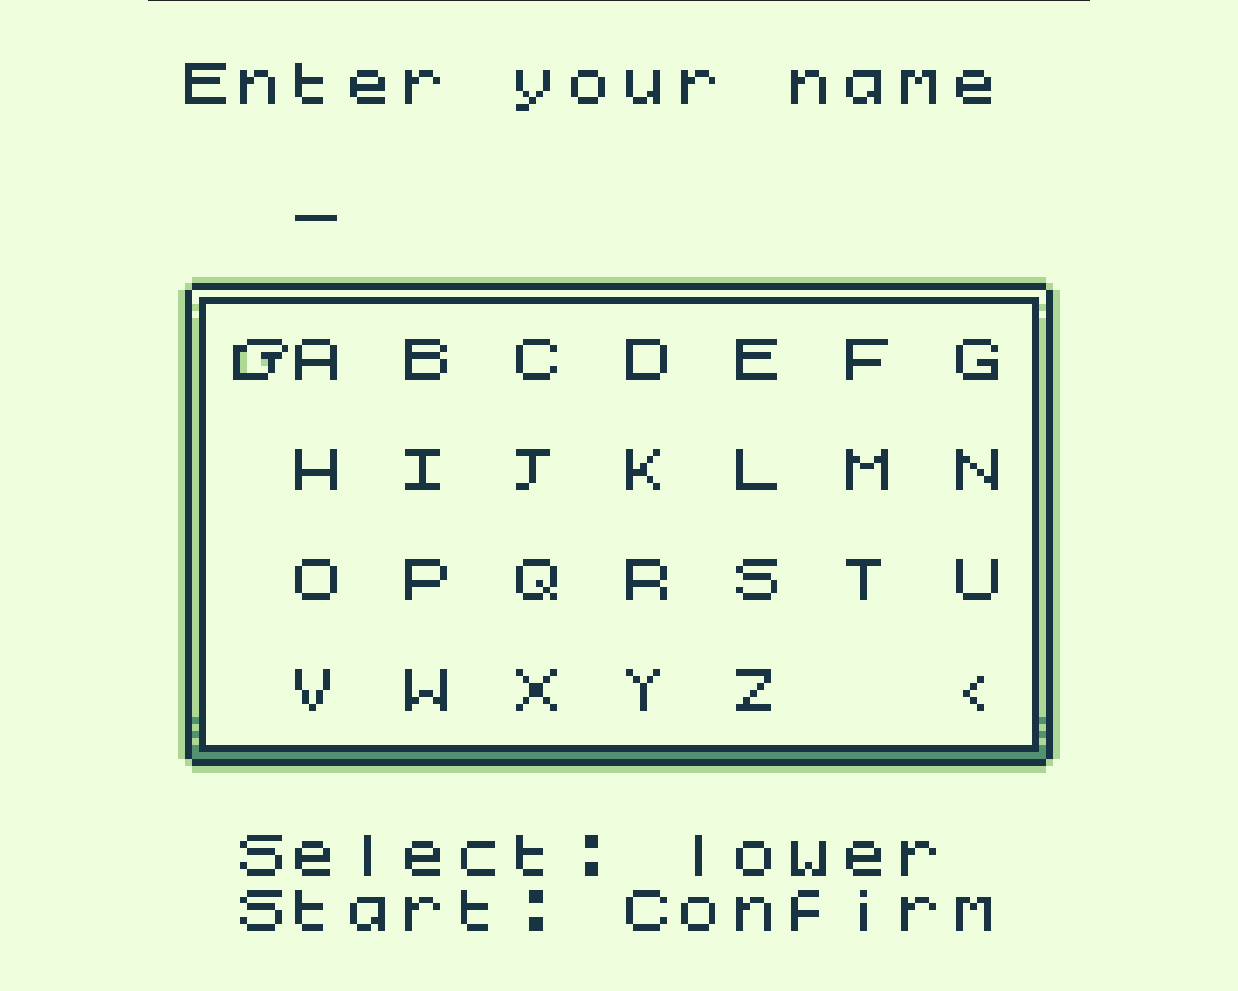
Name Input System for GB Studio 4.0
I recently started exploring GB Studio with the latest version (4.0), and I wanted to let the player enter his name. I couldn’t find a solution that fit my needs, so I created this simple text input system.
I’m sharing it for free, hoping it might be useful for anyone. No credit or payment required.
Features
- Characters displayed in a grid; each button press changes the selected character.
- Supports up to 5 characters by default (easy to adjust).
- Uses 5 global variables to store the name's characters.
- Press Select to toggle between uppercase and lowercase.
- Press A to enter a character.
- Press B (or the
<character) to delete the last character. - Automatically lowercase after the first character is typed.
- Automatically uppercase the first character.
- Press Start to confirm input.
Integration
I've made the integration with your project as straightforward as possible. All the resources needed are stored in a dedicated folder named name_input so it doesn't mess up with your project.
Integration steps
- Back up your project first!
Seriously, MAKE A BACKUP before doing anything. You may lose your project, and I will not be responsible of that - Copy the files.
Extract the contents ofName Input System 4.0 - Pack.zipinto your project folder. (No file conflicts should occur.) - Open your project.
After opening, a new scene called Name Input will appear automatically. - Update the variable. Set the variables where the inserted name will be stored (see next paragraph).
- Edit the Confirm script.
The Confirm script is executed when Start is pressed. Here you can insert your own logic. By default, it just shows a dialog. You’ll probably want to replace that action with something more useful, such as: - Change Scene, or
- Restore Previous Scene From Stack (if you previously used Store Current Scene On Stack before activating this scene)
Name Variables
By default, the name is stored in Variable 0 through Variable 4.
If your project already uses these variables, you’ll need to change them.
To do this:
-
Open the Set Current Char script.
Inside, you’ll find a Switch with a variable assigned in each When case.
-
Replace those variables with ones that are free in your project.
Rename them with something meaningful, for example (e.g.
NameCh0,NameCh1,NameCh2,NameCh3,NameCh4).
Displaying the Name in Dialog
To print the name in a Dialog use the Character Code formatting:
%c$NameCh0%c$NameCh1%c$NameCh2%c$NameCh3%c$NameCh4
Optional
Do this step only if you know what you are doing.
To give a name to the scene local variables, end probably make your life easier if you need to edit it, open your file variables.gbsres and add the following objects to the variables array:
{
"id": "849bff4b-bc8d-4284-b9f0-4416ffb3640f__L0",
"name": "x", "symbol": "var_x"
}, {
"id": "849bff4b-bc8d-4284-b9f0-4416ffb3640f__L1",
"name": "y",
"symbol": "var_y"
}, {
"id": "849bff4b-bc8d-4284-b9f0-4416ffb3640f__L2",
"name": "posX",
"symbol": "var_posx"
}, {
"id": "849bff4b-bc8d-4284-b9f0-4416ffb3640f__L4",
"name": "currentChar",
"symbol": "var_currentchar"
}, {
"id": "849bff4b-bc8d-4284-b9f0-4416ffb3640f__L3",
"name": "posY",
"symbol": "var_posy"
}, {
"id": "849bff4b-bc8d-4284-b9f0-4416ffb3640f__L5",
"name": "lowerCase",
"symbol": "var_lowercase"
}
Credits
The tile markers of the name I've used are from here:
https://teknajade.itch.io/gb-studio-tile-marker-set
Download
Comments
Log in with itch.io to leave a comment.
any idea how we can integrate this into our pre existing projects?
There is actually a bit of work to do (copy resources, set player and actors sprite sheet ect.). I'll make a video in the next few days and publish it here
I've added the integration instructions, please check it out and let me know it it works for you. I think it is simple enough, so no video is needed
sweet! ill check it out and see if i can integrate it into my game for you to test soon
Let me know how it works
will do